Learn why your nutrition website can benefit from using a photo compressor plugin in this Imagify review.
*Disclaimer: Some of these links are affiliate links, which means when you sign up or purchase from these links we may receive a small commission at no extra cost to you. JK Nutrition Consulting is also a participant in the Amazon Services LLC Associates Program, an affiliate advertising program designed to provide a means for sites to earn advertising fees by advertising and linking to Amazon.com. Learn more in our disclosure statement.
One of the first things users may notice when they come to your site is the speed. If it takes too long for your pages to load you may lose visitors.
If you don’t want to risk losing any traffic there are some things you can do in order to speed up your WordPress website. One thing that will definitely shorten your page speed is looking at image size.
Photos and other images can take up a large amount of website traffic and loading resources* so you want to be sure you are making the most of your space.
A slow site can also affect how search engines display your website in search results and can result in penalties being imposed on you. This could mean fewer people are able to find you online.
One way to do that is by optimizing your photos. Read on to learn how an optimization plugin like Imagify* can help compress photos to give you increased space and speed as well as improve your SEO for more website traffic.
*This is my affiliate link, this means that I will earn a percentage of any sales, at no extra cost to you. Learn more in our disclosure statement.
What is Imagify
Imagify* is an image optimization plugin created for WordPress websites. It will take the photos you have on your website and will compress them into a smaller size all with the click of a few buttons.
Smaller images mean smaller files, more space, and a faster site.
What’s even greater is that you will get a smaller image without losing any quality.
Imagify features
If you are in need of the best image optimizer WordPress has to offer check out the features on Imagify. Here is a breakdown of what this plugin offers:
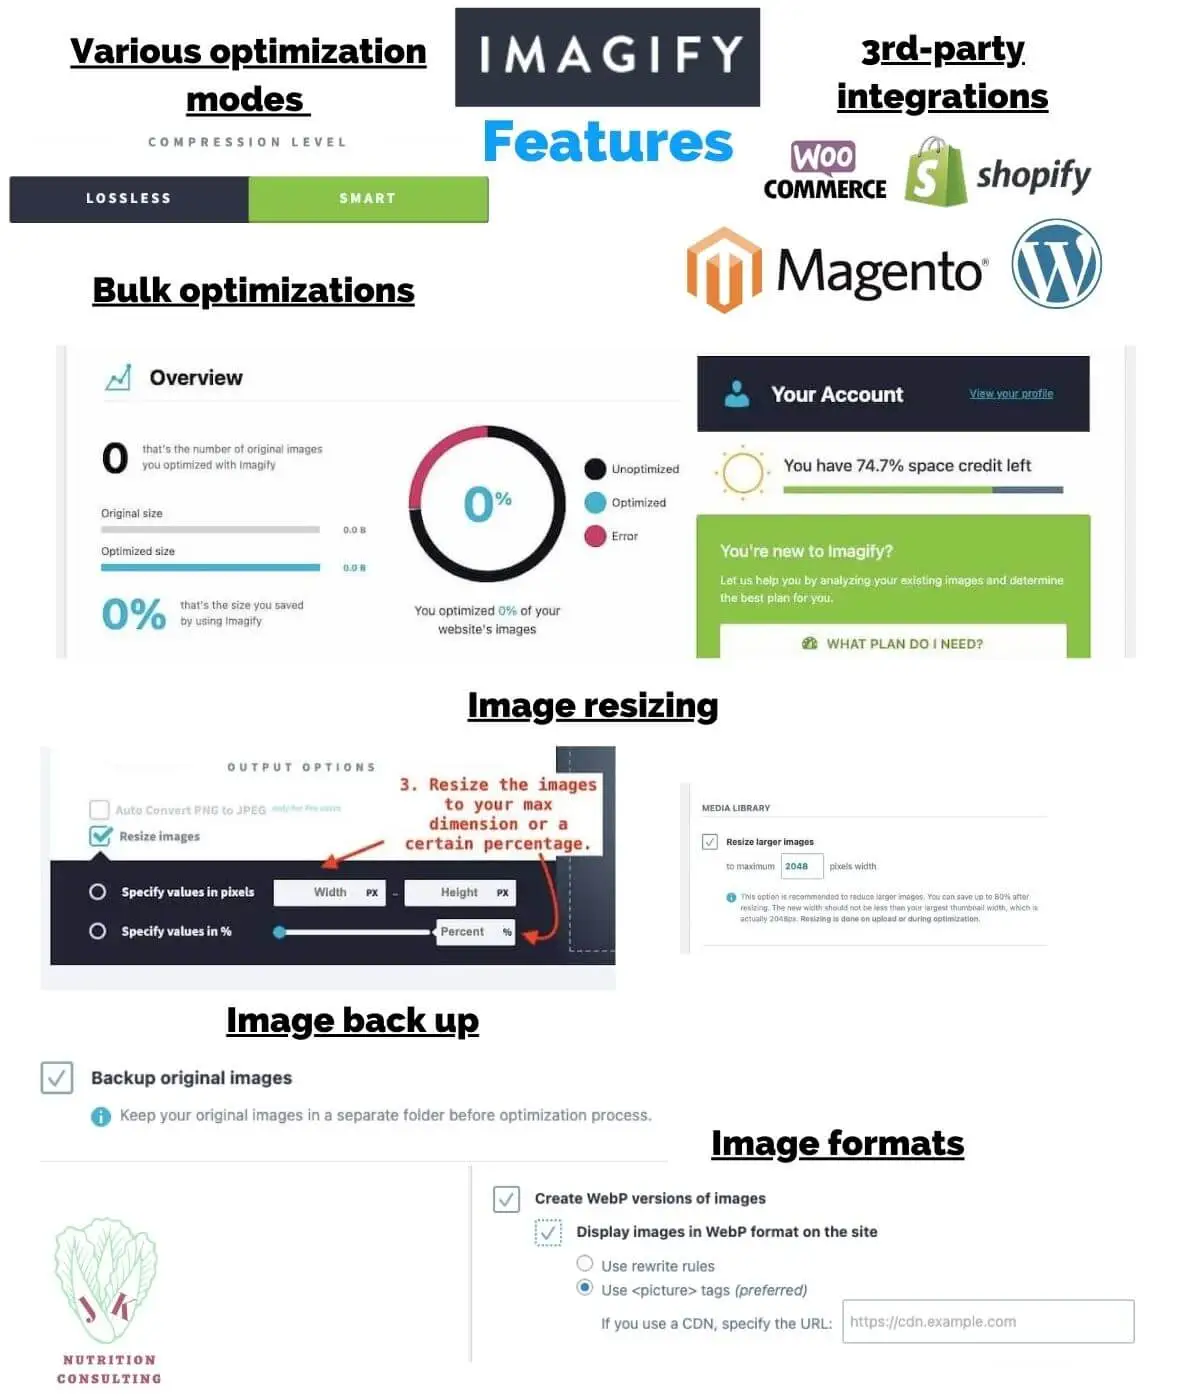
- Image compression
- Two optimization modes
- Bulk optimization
- Image resizing
- Image back up
- Image formats
- Third-party integrations
Image compression
Imagify can compress images with its advanced technology that will not compromise the quality of your photos.
Two optimization modes
Originally, Imagify had three different modes for optimizing photos: normal, aggressive, and ultra. However, in a recent update, they condensed these into just two optimization options:
- Smart compression
- Lossless compression
You have the ability to choose which of these two compression levels are right for you. Get more information on what these levels do in the “How does Imagify work” section below.
Bulk optimization
Want to optimize more than one photo at once? Imagify has got you covered with their bulk optimizer. You can compress multiple images at once making it a cinch to optimize all the photos in your entire library.
Image resizing
Imagify can resize your images automatically to your specific needs. Change your images to the maximum width and height settings needed for optimized web performance.
Image backups
Worried about your original photos? Imagify will automatically create backups of your images before compressing them. So you can access them when needed.
Supports various image formats
No matter the file format Imagify can probably compress your image. This plugin will support everything including
- JPEG
- PNG
- GIFs
Third-party integrations
Imagify plays nice with others. It will work effortlessly to pull images from platforms including WordPress, WooCommerce, Magento, and Shopify, making it easy to optimize your images directly from your CMS or e-commerce platform.
Additional features
In addition to the features above, Imagify will be able to
- Create a NextGen image gallery
- Ingrate with popular WordPress plugins like Jetpack
Image galleries are created with the NextGen* gallery plugin. This can showcase a number of photos in one block.
Any photos added to this gallery will automatically be optimized if this setting is enabled in Imagify.
This additional feature will help showcase your images to give them context and meaning. You can create a dedicated space to display exactly what images you want.
*This is my affiliate link, this means that I will earn a percentage of any sales, at no extra cost to you. Learn more in our disclosure statement.
How does Imagify work
Imagify uses its own web servers to optimize your images. Then once it is complete it will return the optimized image to your website server.
There is nothing you need to do on your end.
Imagify works by compressing your images using a variety of different techniques, including:
- Lossless compression
- Previous compression (Normal, Aggressive, Ultra)
- Smart compression
- WebP conversion
Lossless compression
Lossless compression* is a type of data compression that lets the original data be reconstructed perfectly without any loss of information or quality.
This type of compression can compress a photo up to 50%. This will decrease* your file by 90 percent! That is even without losing any image quality.
Previous compression methods
Previously, Imagify offered three compression methods: normal, aggressive, and ultra. Normal compression was the now “lossless compression” level available to optimize the image. It was good at keeping image quality but not as effective at size reduction as the Aggressive and Ultra levels. However, these levels of compression would degrade the photos.
So Imagify was looking for a way to improve both size and image quality and what they came up with was Smart Compression.
Smart Compression
The new default mode of compression in Imagify is Smart Compression. This mode will compress an image to its maximum potential. Then it will look at the quality of the photo compared to the original.
If the two images do not have the same quality, Imagify will then slow down the compression scale until it has the perfect mix of quality and file size.
WebP conversion
WebP* is an image file developed by Google that is intended as a replacement for JPEG, PNG, PDF, and GIF files since it takes up less space and is more efficient.
This can be done automatically with a few clicks on the setting page. Though it is important to note you do not have to convert WebP images if you don’t want to.
Just note that Google page speed tests are now recommending this image format in order to provide a better user experience.
So if you need to eventually change all your images to this new format using the Imagify WebP is a great way to save time verse changing all the files individually.
*This is my affiliate link, this means that I will earn a percentage of any sales, at no extra cost to you. Learn more in our disclosure statement.
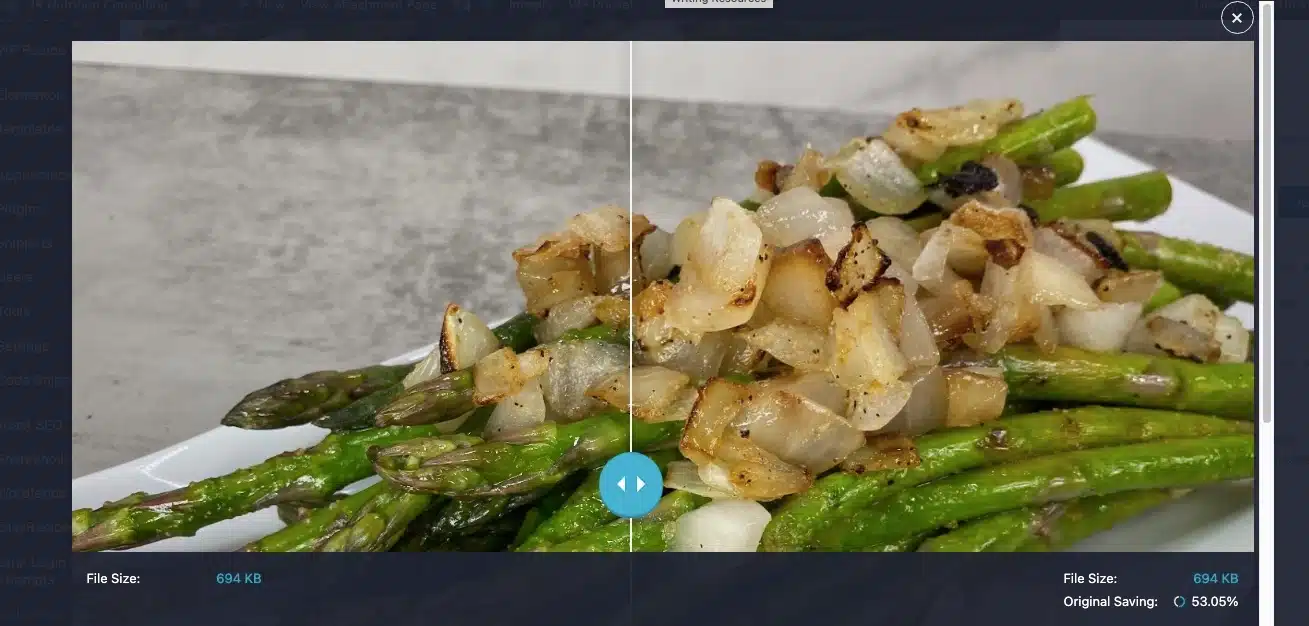
Two ways to compress images using Imagify
There are two ways to compress images using Imagify:
- Through the Imagify WordPress plugin
- On the Imagify website
How to compress images on WordPress with Imagify
In order to compress images on WordPress there are a few steps to go through. They include:
- Download and activate the plugin
- Set up an Imagify account
- Activate the Account
- Configure (pick) the settings you want
- Start compressing images
Download and activate the plugin
The first thing you need to do to get started with WordPress image optimization is to download the Imagify plugin. In order to download the plugin here is what you need to do.
You can do this by going to your WordPress Admin Dashboard. Scroll down to where it says “Plugins” and click the link. You will see a list of your installed plugins.
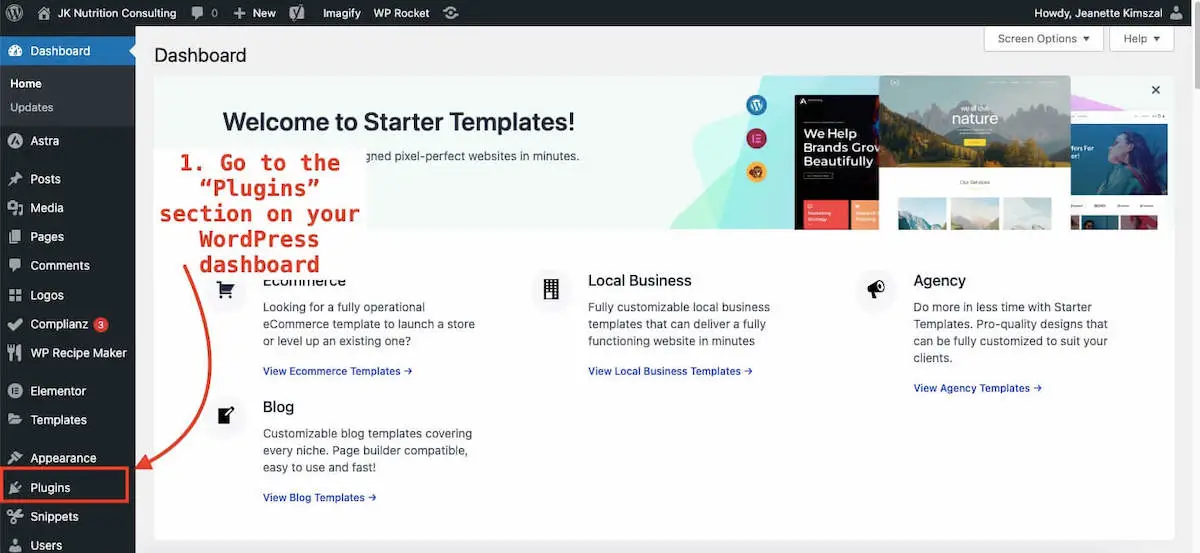
On the top left, there is a button that says “Add New.”
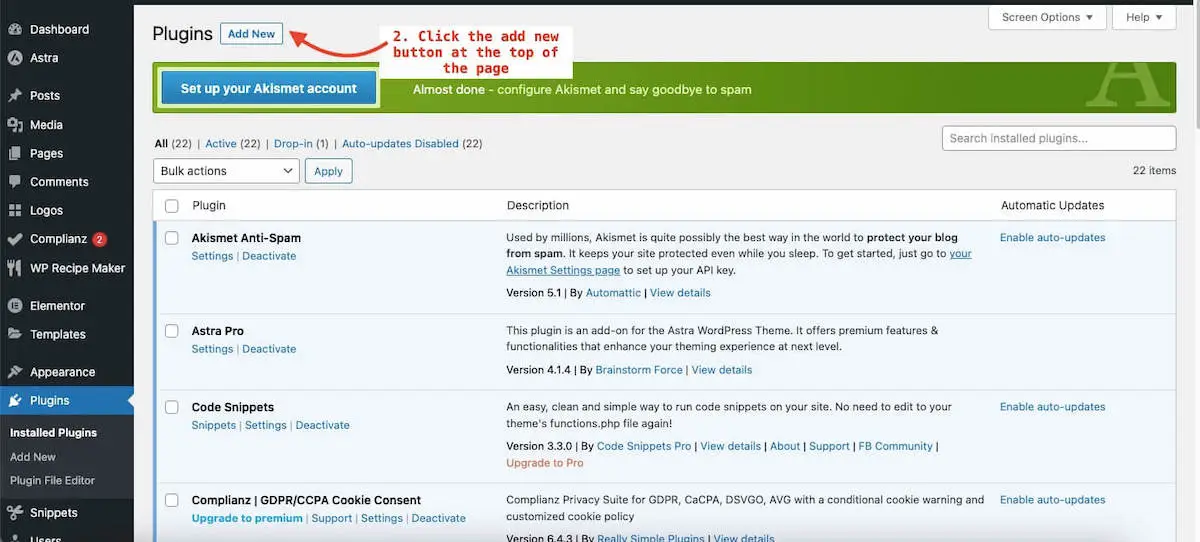
Click that button so a new screen will pop up showing a list of plugins with a search bar on the top right. Type into the search bar “Imagify” and you will see the plugin come up on the left-hand side as the first listing in the search results.
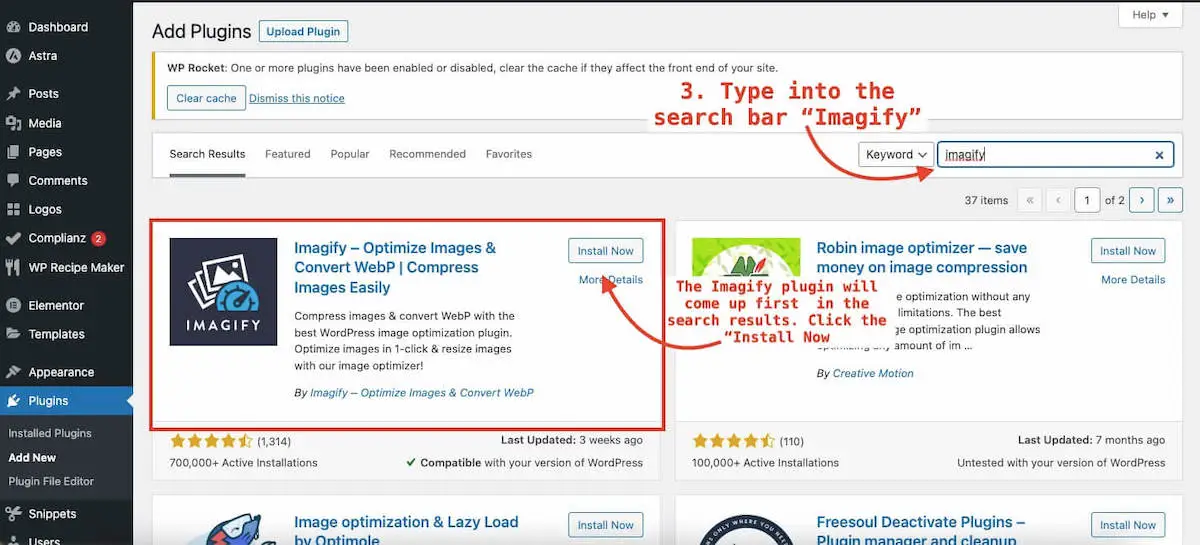
Click the button that says install. Once installed the button will then say “activate.” Click that button to activate the Imagify plugin.

Once the plugin is activated you will see a box pop up at the top of the plugins page that says “Welcome to Imagify, the best way to easily optimize your images!” Below it shows the three steps to set up an Imagify account.
- Create an account
- Enter your API
- Configure it

Set up an Imagify account
To set up an Imagify account start by clicking the button that says “Sign up, it’s free.”
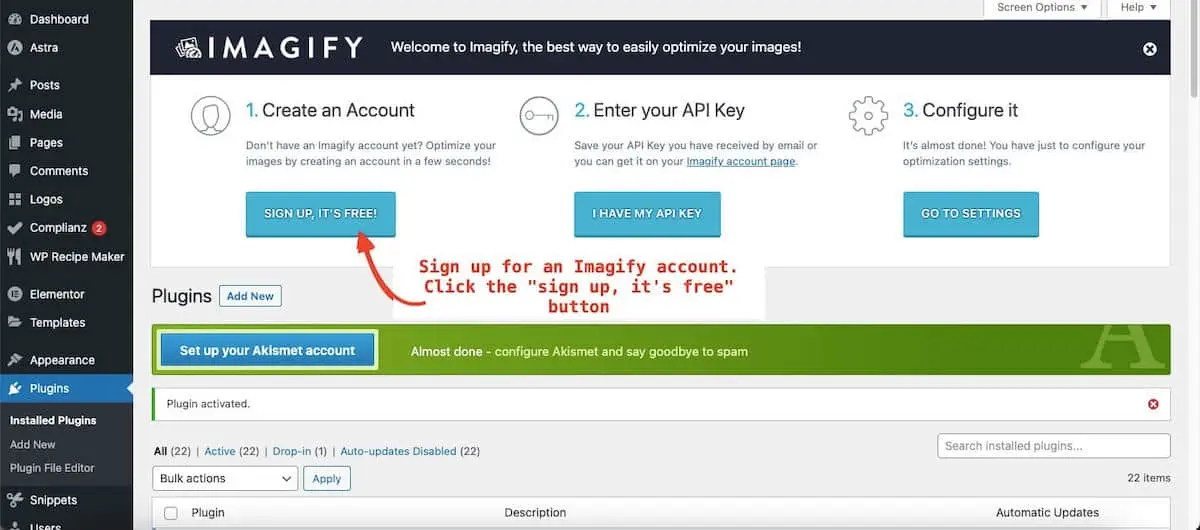
Clicking the signup button will take you to the Imagify login page. You want to click where it says “create one.”

This will take you to a new page where you need to add your email address and input your password. Enter that information and then click the “Sign Up” button.

Activate the account
Once you are signed up you will need to confirm your email. Imagify will send you an email with a link to confirm your account. Click it and it will bring your account.
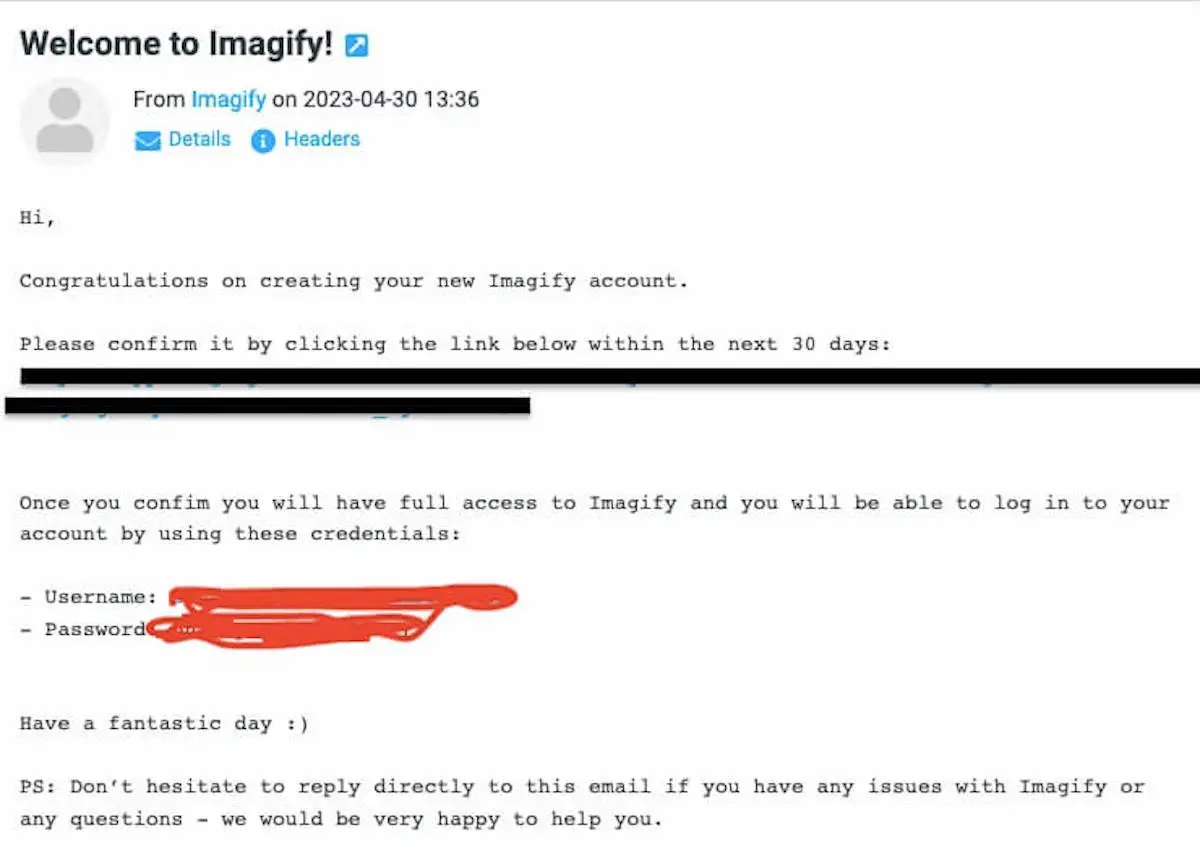
This link will activate your account. It will also help you find your API key. You need this code in order to be able to compress photos on your WordPress website.
The API key can be found in the settings tab. In the right-hand corner of the screen, you will see a blank photo of a person and it will say “0.0 KM/200 MB used. You have 100% credit left” with a little “V.” Click the “V” and you will see a dropdown with options. One will say “API integrations.” Click that option.
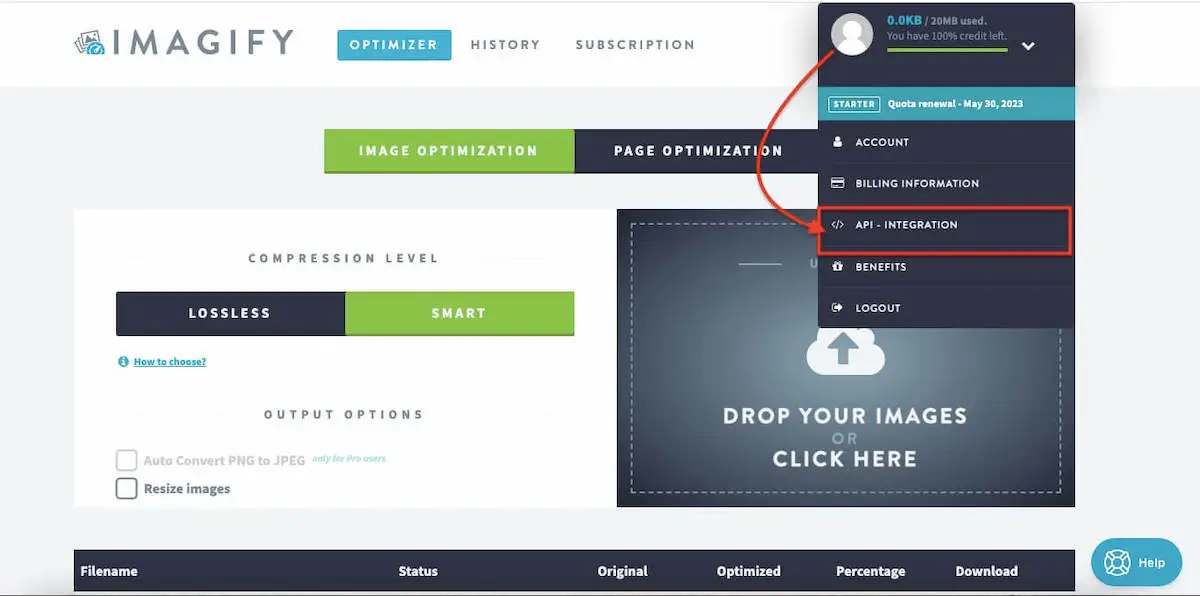
A screen with a box will give your API number. You want to copy the number from the Imagify website.

Then go back into the WordPress dashboard plugins page and click the button that says “I have my API” on the plugins page.

A box will pop up where you can type in your API number. Paste the copied API into the box and hit the “Connect Me” button.

If it works you will get a box that says “Congratulations your API is valid. Now configure the settings.” Click the ok button underneath.

Once your API is set up it will take you back to the the plugin’s page of your WordPress dashboard. You should see the three boxes at the top for getting Imagify set up. Click the button that says “3. Configure settings.”
Configure (pick) the settings you want
Once you click the “configure settings” button a new page will open six sections of Imagify settings. They include:
- General settings
- Optimization
- Media library
- Custom folders
- Files optimization
- Display options
General settings
The first section is General Settings. It will automatically have the “Auto-Optimize images on upload.” and “Backup original images” boxes clicked.

This will ensure that every image uploaded to WordPress is automatically optimized for quality and photo size. It will also guarantee you will not lose your original image.
You can see that the “Lossless Compression” box is not checked. This mode will compress images without any visible change but it does not reduce photo size better than the Smart Compression option.
So the performance of your website will be affected if you use the Lossless Compression mode.
If you are someone whose photo quality is more important than performance you may opt to use this compression level.
Optimization
When you scroll down you will see a second section labeled the “Optimization Section.” Underneath it will say “WEBP FORMAT.” Here you can choose whether or not you want to use the WebP format.
This image format compresses images smaller than other files while still keeping the quality. It is also a format recommended by Google for faster page load times. So you may want to consider using this type of file for your images.
Clicking the “Create WebP versions of images” button will give you an optimized image in both the original format as well as WebP version. This will serve the image even on browsers that are not supporting WebP yet.
It is also recommended to click the “Display images in WebP format on the site” box. Underneath there are two additional options:
- Use rewrite rules
- Use <picture>
This helps display images as WebP if the web browser supports that version of the image. Otherwise, it will show the original image file format.
Use Rewrite Rules
The “use rewrite rules” is just what its name says. It will rewrite a rule to your site’s files to not alter any website code. This option does not work with a CDN though. So if you have a CDN you should use the second option.
Use <picture>
The “use <picture>” option will replace the <img> tags with <picture> tages. This is preferred but it may affect some website themes so be careful and check how it affects your website. The “use rewrites” may be a better option unless you are using Cloudflare or another CDN.
If you find you are having issues with your images after adding these settings, Imagify also has information on how to fix this issue.
Where it says “If you use a CDN, specify the URL” you only need something in the box if you are using a standard “classic” CDN that gives you a custom CNAME, CDN, or URL.
If you are using Cloudflare you can leave this blank.

Media library
The media library will be clicked and there will be a box with a number. You want to make sure it is the same as the number that is in the blurb below the box.
This will ensure you are saving file size on larger images and the width of the photo is less than your largest thumbnail width.

Custom folders
Imagify will automatically optimize photos in your media library but you may have images in other folders on your website server that are not being optimized. The custom folders setting gives you the ability to optimize any other images on your website including images in your theme.
If you click the “Add Folders” button it will open a list of all the folders on your website. You can click on which folders you want to add. Then once they are added you would go to the “Bulk Optimizer” which you can get to by clicking the “Save And Go To Bulk Optimizer” button at the bottom of the settings page.
The new optimized images can be found in the “Other Media” section within your WordPress Media Library.

Files optimization
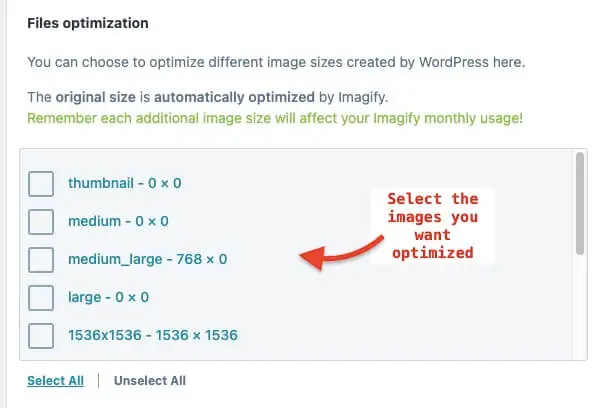
The files optimization section will list all the thumbnail image sizes found on your website that are created by WordPress when you upload an image. You have the option to let Imagify optimize and create WebP versions (if you have chosen to enable WebP format) for each thumbnail size that is checked.
Imagify recommends keeping all of these sizes that are used checked off. Just know that optimizing multiple thumbnail images will also eat into our monthly usage.
So if you just want your main image optimized you can leave the boxes blank for anything you don’t want optimized.
Display options
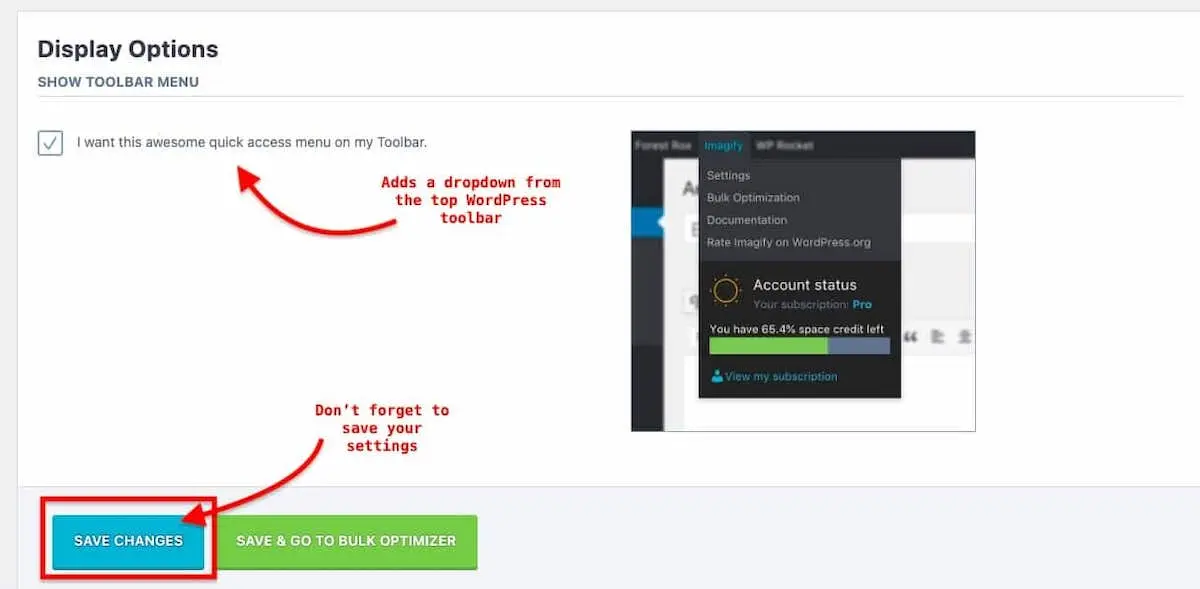
The last section of the Imagify settings page is the Display Options. This section will just ask if you want to have a quick-access menu on your toolbar. The display options section shows a picture of how it will look.
It is a nice way to know how much photo optimization you have left. It will also link to the bulk optimizer in case you need to compress multiple photos.
Finally, you want to make sure you save your changes. Click the “save changes” button
Start compressing images
Compressing photos on WordPress is super easy once you have the Imagify plugin activated and configured.
All you need to do is upload a photo like normal. You go to the Media Libary on your WordPress dashboard. Then go to “Add New” and you will see a screen with a dotted box that says “Drop files to upload or select files.”

Click the “select files” button and then choose a photo you want to upload.

After you click the “open” button on your computer WordPress and Imagify will simultaneously upload and compress the photo. You will see the progress in a percentage bar.

After it hits 100 percent the photo will appear in a thumbnail on the left. On the right, it will say “copy to clipboard.” and “edit. To see the changes in the compression you can click the “edit” button.

That will open a new page showing the photo information including the Imagify compression information. Here is also where you can restore the image to its original version.

If you want to see what other old photos in your library need to be optimized you can go back to the “Media Library” section and it will list out your photos. In ascending order from when you uploaded them.
Photos that need to be optimized will show an “optimize” button. Optimized photos will show the details of the new file size and how much space Imagify saved it.
If you want to restore the original photo just click the “restore original” link from here as well.

How to Bulk Compress WordPress Images with Imagify
The nice thing about the WordPress plugin is it offers bulk and automatic compression. Once installed Imagify will compress and resize any new photo that is added to your dashboard. You also have the ability to optimize multiple images at once.
This section will also give you a percentage of what photos are
- Optimized
- Unoptimized
- Error
It’s a nice way to see an overview of all your website photos. It also tells you how much credit you have on your account.
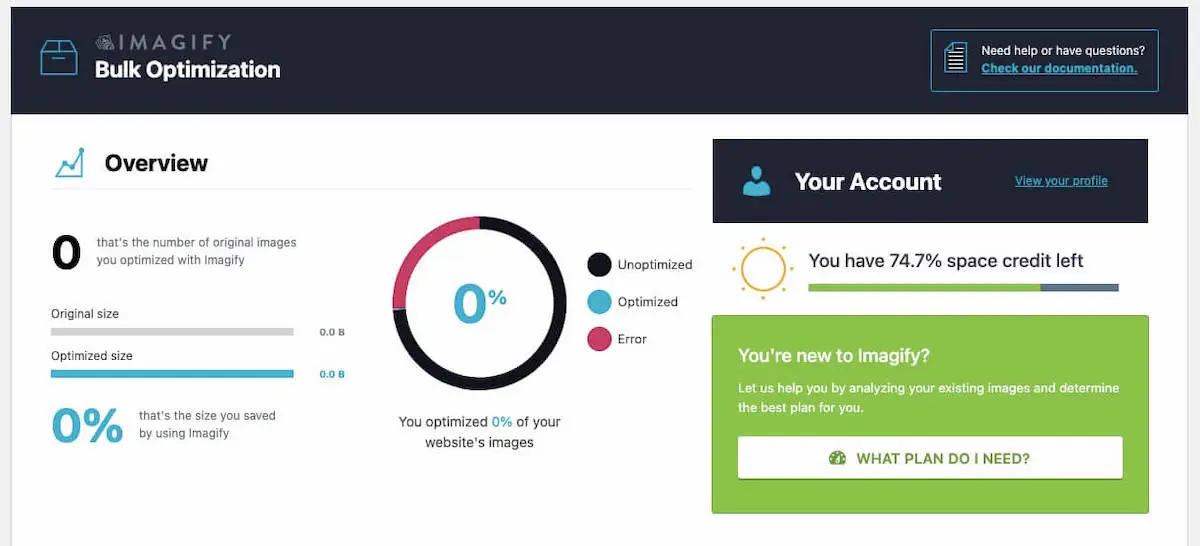
If you scroll down on the bulk optimizer page you will see a section that says “Optimize Your Media Files.”
This section will let you know exactly how many files are optimized. You can also link to your media library from this section to add more photos.

Once you are in the media library then upload the photos you want to compress.
If you already have images on your website you can also compress these with Imagify. It is as easy as clicking a compress button.
You can add these new images to your WordPress posts.
How to compress images on the Imagify website
While using the WordPress Imagify plugin is great however if you’re looking to save time you can use Imagify’s web interface to both compress and resize multiple images from one single place.
This is great especially if you run more than one website and hate to have to go back and forth compressing different photos.
Pick your desired compression level
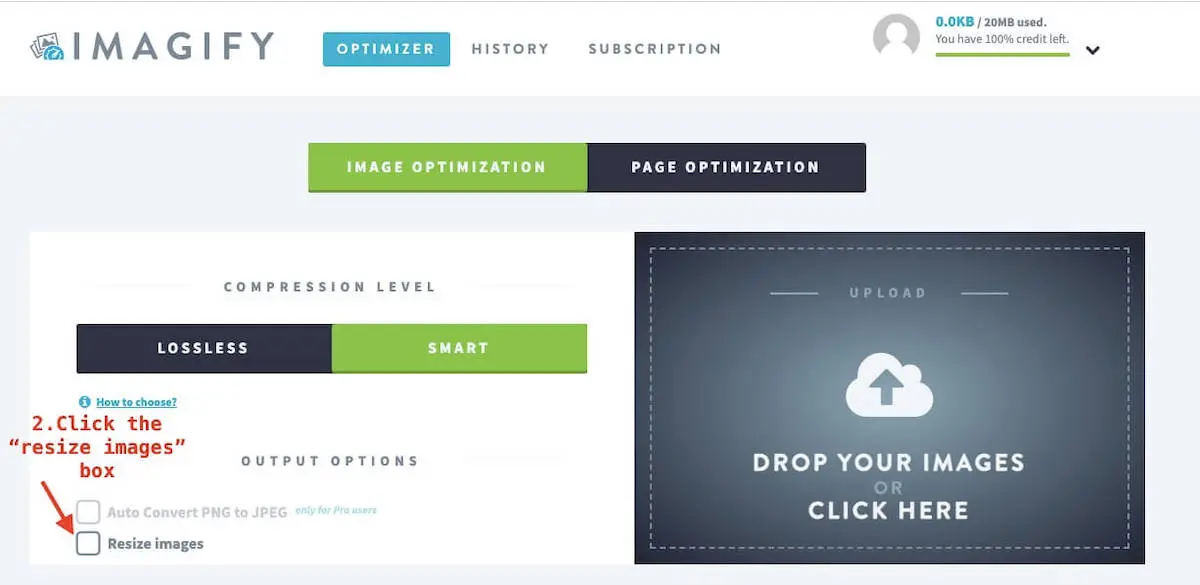
Just go to Imagify’s web page* and put in your desired compression level. Smart or lossless.
The “Smart Compression” setting is the same as the “Auto-Optimize images on upload” on the WordPress plugin. This mode will compress your image to get the best results without sacrificing quality.

Resize images by dimensions or a percentage
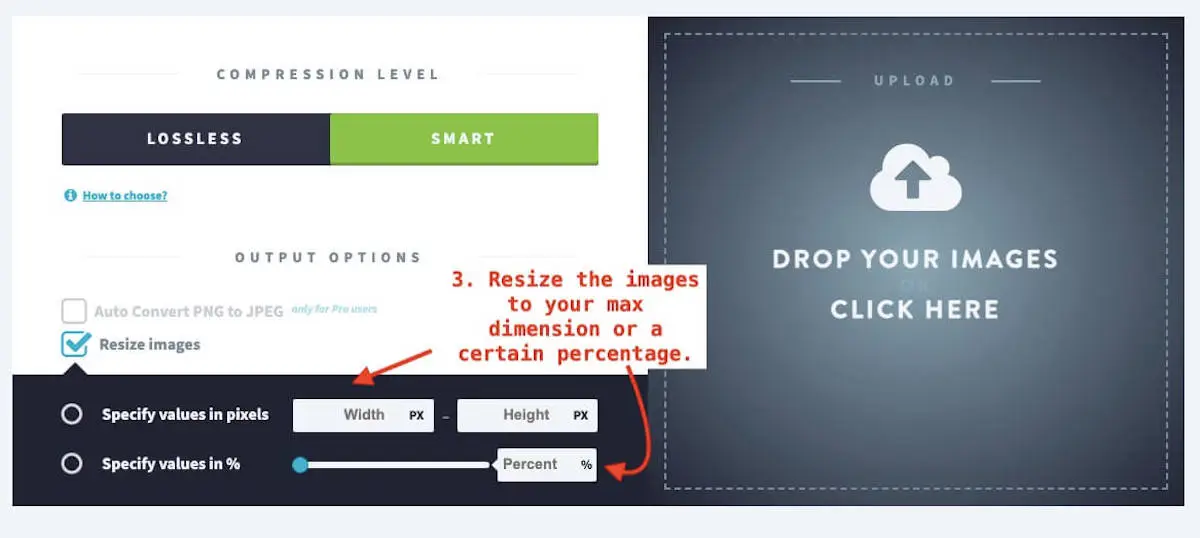
Then click the “resize images” box. This will open up a section showing options to choose from. One says “specify values in pixels” with two blank boxes showing a pixel width and height. Then below that is an option to resize the image by a certain percentage.
Choose whether you want to put in a specific pixel size or percentage. If you chose pixels put in your max dimensions. If you choose pixels, input the percentage to that which the photo should be resized.
Add your images to the website
Once the settings are locked in you just need to drag your images into the box on the right-hand side where it says “Drop Your Images.”

This will open up your computer files and you can pick the photo or photos you want to compress. Be sure that the photo is under 2 MB otherwise, it will not be able to be resized.

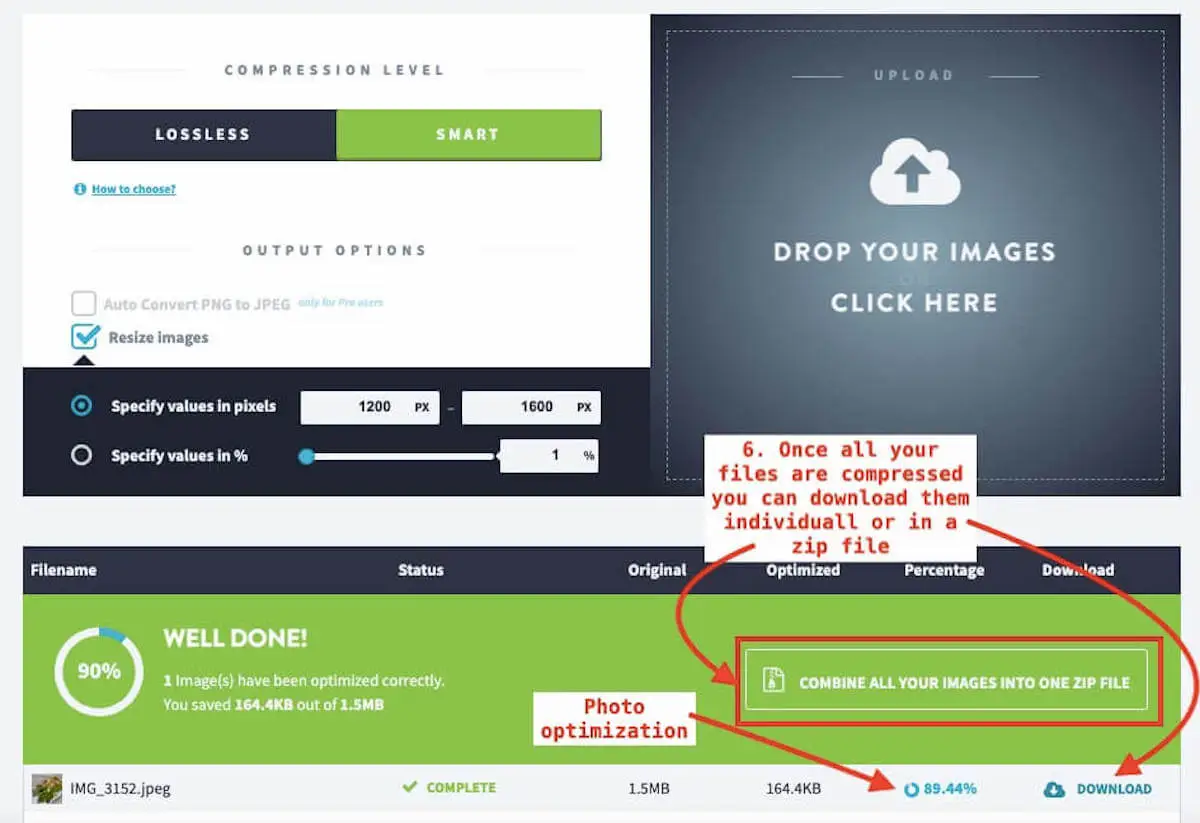
It will be automatically moved into the compressor. When the photo is done being resized and compressed you will see a green box appear showing you the status of the photo and how much it was optimized.
You can continue adding one photo at a time or click multiple photos as you want and compress them all together.
Download the compressed images
When all the photos are done being resized you can download them individually or together into a ZIP file to your computer.
Add the compressed images to your WordPress site
Now the photo(s) are ready to be added to your WordPress site.
Compress a whole web page of images
Using the Imagify website compressor, you also have the option to optimize a whole website page.
Simply type in the URL of the page you want to optimize and click the “LAUNCH OPTIMIZATION” button. It will retrieve your images from the website page automatically.

Depending on how many photos you have on the page will determine how long it takes to pull up the list of photos that need to be optimized.
Whether you are using the Imagify WordPress compress images plugin or accessing the Imagify website directly, rest assured that the compression results will be consistent.
What Happens To The Backup File Original Image File
If you’re wondering what happens to the larger image file. It is safely stored in a dedicated folder* in case you need it in the future. You just need to make sure the Backup option is turned on in the Imagify settings.
How to get the best Imagify experience
To get the most out of the Imagify WordPress plugin you want to follow the prompts for new users. There should be a green box that reads, “You’re new to Imagify?” Let us help you by analyzing your existing images and determining the best plan for you.”
Additional tips on how to get the best Imagify experience include the following:
- Choose the right plan
- Optimize for WebP format
- Use the bulk optimizer
- Enable automatic optimization
- Back up your original photos
- Remove EXIF data
Choose the right plan for you
Your photo optimization needs will let you know if the free plan is right for you or if you need to upgrade to a paid plan for more space.
Turning your photos into the WebP format will give you the best quality and compression. Using photos in this format will also help improve your website performance and make Google happy. When Google is happy it will drive more traffic to your website.
*This is my affiliate link, this means that I will earn a percentage of any sales, at no extra cost to you. Learn more in our disclosure statement.
Use the bulk optimizer
Both the WP plugin and Imagify’s website offer a bulk optimizer. This is a great way to compress multiple photos at once. So you get more done in less time.
Enable the automatic optimizer
Another way to save time optimizing old photos is by enabling the automatic optimizer. This feature on the plugin will simultaneously optimize photos as they are being uploaded to your website.
Back up your original photos
You want to be sure to keep the backups of your photos. This will be important in case you need to revert back to the original image.
Remove EXIF data
Keep EXIF data removed from photos to save space. EXIF data is the information about the photo such as the date and time it was taken. When you install Imagify removal of EXIF data is standard, however, I just wanted to mention this is another tip for getting the best experience with Imagify. It may also help speed up your website.

How well does Imagify compress images?
When compared with other image compression companies Imagify is a very effective tool. It can compress images without sacrificing quality. The addition of the WebP format offers even further compression that may not be available with other photo compressors.
Let’s see how it stacks up to the competition.
WP Smush vs Imagify

WP Smush is a lossless compression tool that will optimize images as you upload them to your WordPress dashboard. It is a great free tool for beginners who want a simple way to optimize their images and improve website speed.
Like Imagify it has bulk optimization and automatic optimization. However, there are some things this plugin is lacking. WP Smush does not offer the WebP format. Additionally, it does not offer lossy compression. So those who want to really reduce their file size may not be happy with the results of WP smush.
Depending on your experience level and budget WP Smush may be a good option. However, if you are looking for more control over your optimization Imagify might be better.
ShortPixel vs. Imagify

ShortPixel is a compression tool that offers lossy, lossless, glossy, and a compression that combines both the lossy and lossless techniques to optimize image quality and file size. This is a more aggressive compression method than what is offered by Imagify.
Like Imagify, ShortPixel also offers WebP format along with automatic and bulk optimization.
ShortPixel has a free plan so you can try it before you buy. It gives you 100 free credits to use per month. One credit is 5 MB so you get about 500 MB per month. This is more than what Imagify gives on their free plan.
Another difference with ShortPixel is that you need to pay per website domain. You need to pay more if you have multiple websites.
If you need more aggressive compression than what Imagify is offering ShortPixel might be a good photo optimizer for you.
TinyPNG vs. Imagify
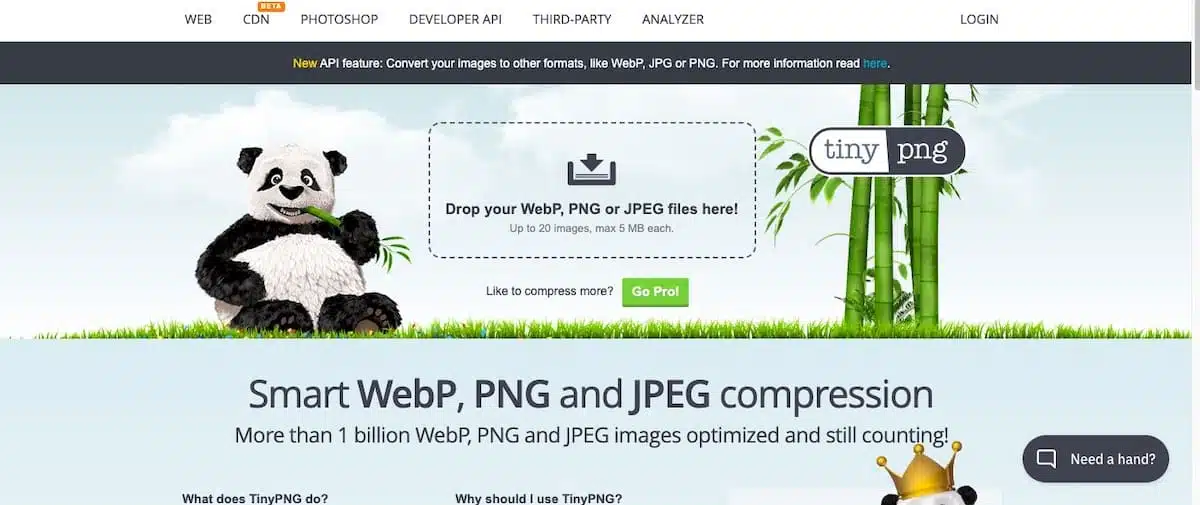
TinyPNG is a web-based online image png optimizer. This means it is a tool that reduces the file size of Portable Network Graphics or PNGs. It uses lossy compression to remove unnecessary metadata. It also reduced the number of colors used in the image.
So the file size shrinks while still keeping the visual quality of the photo and ultimately improving website speed.
Since it is web-based, users can only utilize it from the company’s website as there is no WordPress plugin available.
While primarily a png reducer it can compress JPEG online as well. Once you upload the photo to the website you just need to click a button to shrink the photo. Then you can download the compressed photo to your computer.
TinyPNG is free to try but be aware there are compression limits. The paid plan offers more flexibility and if you are a tech wizz you can also batch compress your photos via their API.
It is important to know that TinyPNG is also not a WebP compressor. So you cannot get WebP photos from its compression. It would require an extra step to compress the photos to that format before uploading them to your website. For anyone looking to save time Imagify would be a better option.
TinyPNG is a good alternative if you are looking for a free and easy-to-use tool.
Optimole vs. Imagify
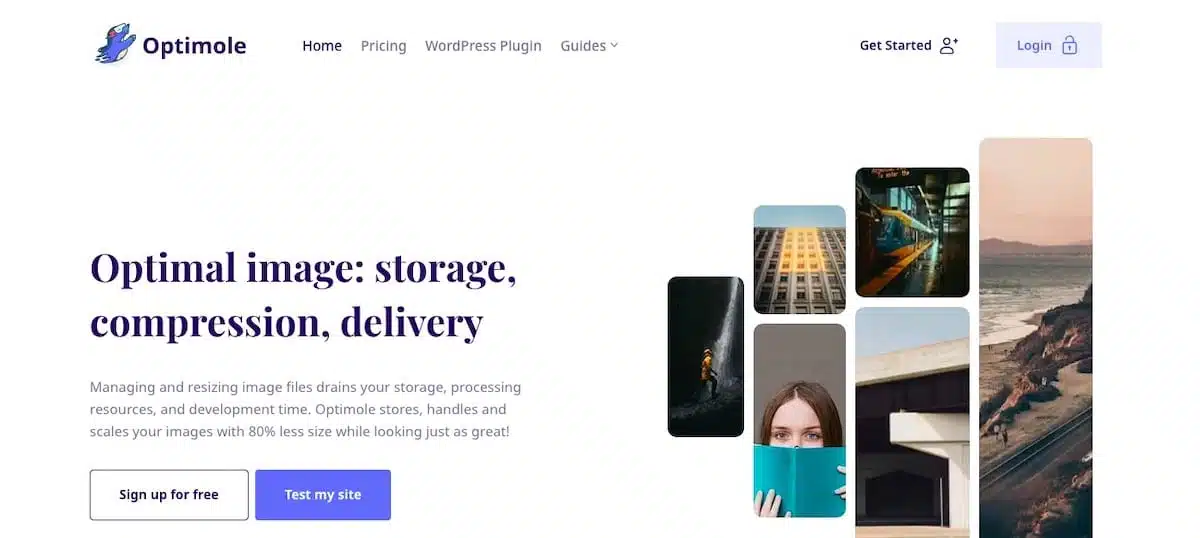
Optimole is a cloud-based image optimizer that uses lossless compression to reduce the file size of photos. This means it uses its own servers to compress photos instead on your website like Imagify.
The plugin also offers a lossy compression option that is more aggressive than Imagify.
This photo compressor also supports WebP format, lazy loading, and bulk optimization. Optimole does not have automatic optimization.
Optimole offers both a free and paid plan. The free plan offers say it allows you to optimize an unlimited number of images within the limit of 5,000 visits per month. However, it is uncertain how many photos or MB this translates to.
If you need a higher level of compression than what Imagify can offer, Optimole may be something to try out.
How does Imagify compare overall?
Ultimately, the best image compression tool for you will depend on your specific needs and requirements. If you are looking for a powerful and easy-to-use tool with a variety of features, Imagify is a good option.
Imagify Pricing
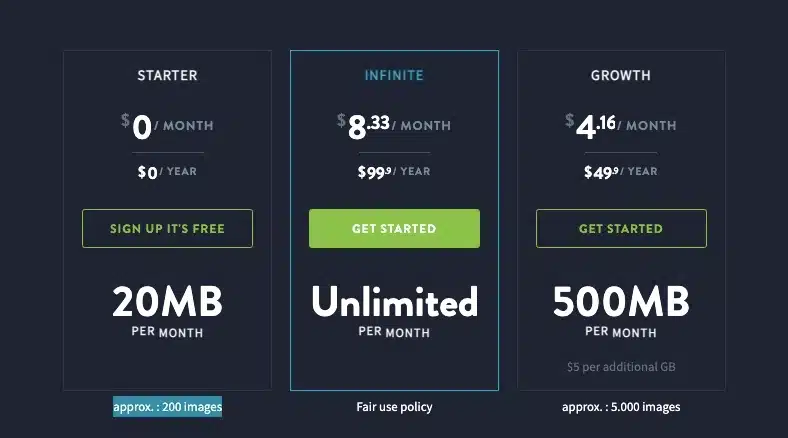
Imagify is free to use. However, like with most free plans there are restrictions. To start Imagify offers 20MB of compression a month. According to their website*, this is about 200 photos.
This is a great way to try the product out to see if you like what it has to offer. If you have a lot of photos to compress you may want to look into a paid plan.
There are two tiers:
- Get Started
- Unlimited
The Get Started* plan costs $4.99 per month ($59.88 for the year). With this plan, you can compress up to about 5,000 images a month.
The Unlimited plan* costs $9.99 per month ($119.88 for the year). This offer unlimited compression with a “fair use policy.” This means you can optimize as many photos as you want within reason. If you wind up compressing too many photos they may contact you about your usage.

They also have the option to pay for the year in full. This will give you about a 16 percent discount off the regular price. Which saves you $9.96 off the Get Started plan and $19.96 off the Unlimited plan.
*This is my affiliate link, this means that I will earn a percentage of any sales, at no extra cost to you. Learn more in our disclosure statement.
Imagify’s Impact on Google speed score?
How fast your pages load will determine how well you rank on Google. Photo size will directly impact this score. So adding Imagify to your website can positively impact your website’s speed score.
If you want to see how your website is currently ranking go to Google’s Page Speed Insights and type in a blog post from your website. If you see something that says “Serve images in next-gen formats” or “Efficiently encode images” you need to get a compression plugin that will reduce file size and format them into WebP.
Another way to test your photo page speeds is with GTMetrix. Plug in a URL and see what it spits out. If you get something that says “Total Page Size” or “Optimize Images” you may benefit from using a photo compressor like Imagify*.
From there, you want to fix your photos using a compression tool like Imagify. Then retest the page to see the new results.
If you’re looking for a big increase in performance you may want to think about also adding a caching plugin to your website. The combination of Imagify plus the Worpdress caching plugin WPRocket will give your website an even better speed score.
My Google Page Speeds Improved with Imagify
Before installing Imagify I had these errors on my website photos. However, after installing Imagify I was able to pass Google’s audits.

Imagify Pros and Cons
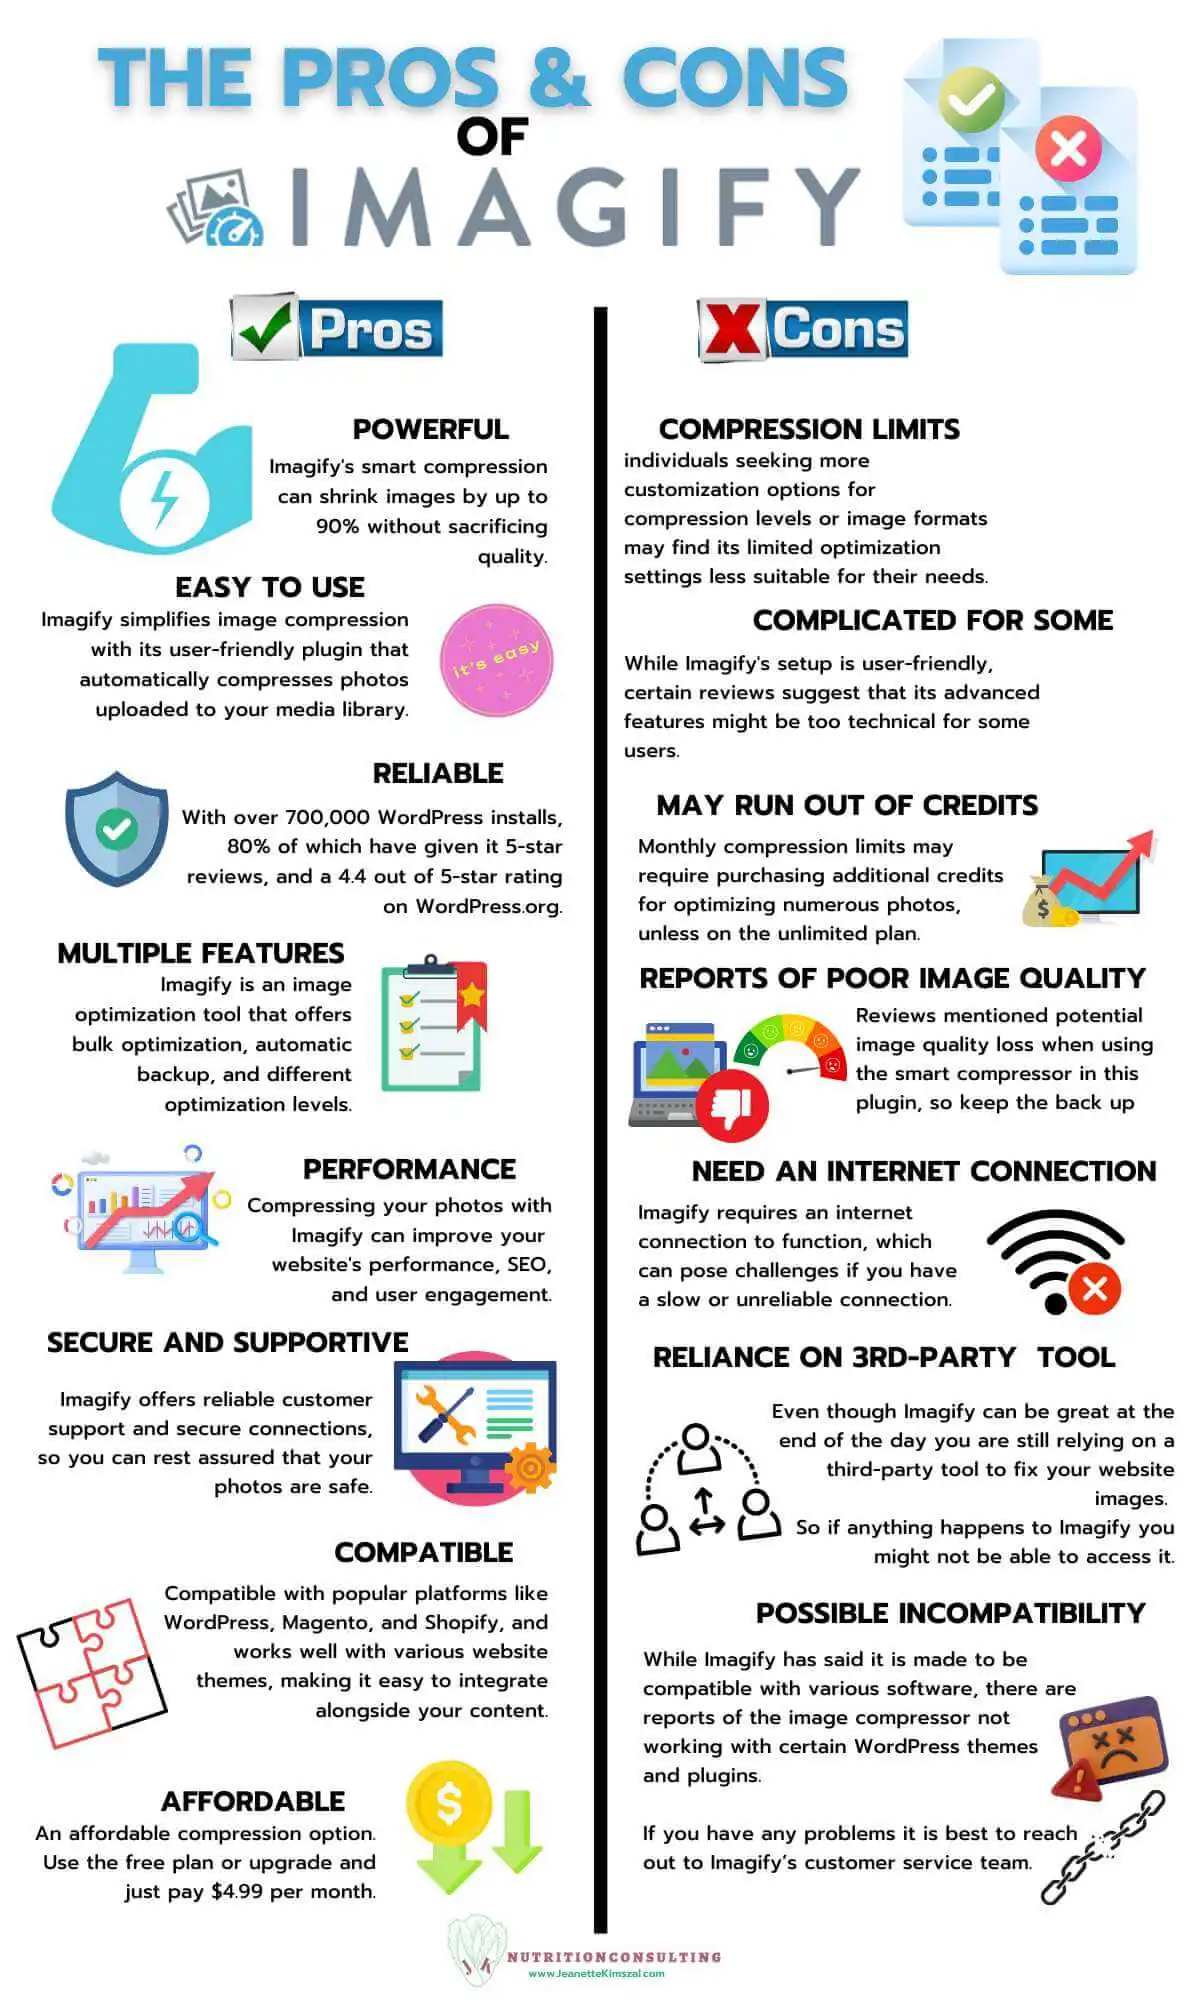
Here is a comparison of the pros and cons of using Imagify.
Benefits of Using Imagify
The benefits of using Imagify include the following:
- Power
- Multiple features
- Performance
- Easy to use
- Reliable
- Compatible
- Secure and supportive
- Affordable
Multiple features
Imagify offers many features including the following:
- Ability to bulk-optimize images
- Automatic backup
- Different optimization levels
A nice thing about Imagify is the ability to optimize a number of images at once. Their bulk optimizer will work in the background compressing files while you are free to work on other projects.
There is also an automatic backup that can restore original images with a click of a button.
As mentioned above you have the option to choose from two different optimization methods: smart or lossless. This will help you find the right balance between image quality and file size for your website.
Power
Imagify has a powerful compressing algorithm that will shrink your images without sacrificing quality. Its “smart compression” can save up to 90% of the total image size*.
Performance
The smaller your photos get, the better your website will perform. This is because smaller photos can load quicker and so will your website. This will make people like your website and want to engage with your content longer.
Enlisting Imagify to compress your photos will also help your Google rankings and potentially drive more traffic to your website.
Easy to use
As you saw in the examples above, Imagify is pretty easy to use. Once you set up the image compression plugin all you need to do is upload a photo to your media library. Then Imagify will take it from there and automatically compress your photos.
Reliable
The latest version of Imagify has over 700,000 WordPress installs with 80% of their reviews being 5 stars. It has a 4.4 of out 5 stars on WordPress.org. This makes it a pretty reliable compression plugin.
Compatible
Imagify is compatible with a range of platforms including WordPress, Magento, and Shopify. It has also been known to work well with various website themes.
According to the company*, Imagify will work with any WordPress site. So all WordPress themes should be able to integrate Imagify alongside your content
Secure and supportive
If you do come across any problems the company can be very helpful. They have a dedicated staff there to troubleshoot any issue that you may come across.
Human customer support is available. Simply fill out a contact form on their website or get to it through your Imagify plugin settings page.
Your photos will be safe with this plugin. Imagify has secure and encrypted connections.
Affordable
Imagify is an affordable option. You can stick with the free plan or upgrade and just pay $4.99 per month.
Cons of Using Imagify
Though Imagify is a powerful tool that can improve not only photo size and website performance there are some downsides to this plugin. They include the following:
- Compression limits
- Too complicated for some people
- Reports of loss of image quality
- May run out of credits quickly
- Reliance on a third-party tool
- Need an internet connection
- Possible incompatibility with websites
Compression limits
While the compression Imagify offers is really optimal people who want more options may not be happy with just the limited optimization settings. If someone needs more control over their compression level or image format, Imagify may not be the best option.
Too complicated for some people
Though I find Imagify to be easy to set up, some reviews have said it some of the advanced features could be too technical for some people.
Some reports of loss of image quality
Some reviews of this plugin* reported a loss of quality on images after being run through the smart compressor. This could vary by photo so it’s best to test the image and keep the backup.
May run out of credits quickly
Another potential downside of Imagify is there are monthly compression limits. That is unless you are on the unlimited plan. So if you have a lot of photos to optimize you may need to purchase more credits.
Reliance on a third-party tool
Even though Imagify can be great at the end of the day you are still relying on a third-party tool to fix your website images. So if anything happens to Imagify you might not be able to access it.
Need an Internet connection
Since Imagify is a web-based product you need an internet connection to run it. This can be problematic if you have a slow or unreliable internet connection.
Possible incompatibility with websites
While Imagify is designed to be compatible with various software, some users have reported instances where the image compressor does not function properly with specific WordPress themes and plugins.
If you have any problems it is best to reach out to Imagify’s customer service team.
Imagify frequently asked questions (FAQ)
Imagify works by compressing and optimizing images in order to reduce their file size without sacrificing quality. Upon installation, Imagify will automatically detect and process an image for optimization when its upload it to your website.
Once compressed, Imagify, will then remove unnecessary information from the photo such as file data, metadata, comments, and color profiles. This optimizes the image.
Another thing Imagify does is convert the photo format to WebP. This newer image format offers a smaller file size while keeping great image quality.
Finally, the original image is replaced with a smaller optimized image which can be placed on your website.
Yes, Imagify can resize images as part of the optimization process. Upon upload, it will automatically detect the photo’s size and dimensions. If the image is larger than the maximum size you specified in your settings, Imagify will automatically resize it to the required dimensions before optimizing it.
This feature is great to reduce the file size of any large photos that may be slowing down your website.
Imagify can also crop images to a specific size and aspect ratio. This is helpful if you need photos to fit a particular website design layout.
The “fair use policy” on Imagify refers to how many photos can be optimized on the unlimited plan. As far as the website states, Imagiry does not charge extra costs on the unlimited plan when it is used reasonably. If there is extreme photo compression being used then the company will contact you and let you know about potential alternatives. The service usage may also be limited.
Yes, Imagify converts photos to the WebP format. This is a newer photo format developed by Google that offers a smaller file size without comprising image quality. These smaller photos will improve loading speed, especially on mobile.
To activate WebP you just need to click the “Create WebP versions of images” button on the settings page of the Imagify plugin. From there, any photo that is uploaded to your website will automatically be changed to the WebP format.
The best thing is that depending on what a user’s web browser supports will determine how the photo is served. So if it does not support WebP will serve the original image format.
When the Imagify plugin is disabled, your existing images will remain optimized. Backups of the original images will also still be available if you have enabled the images backup option in the settings page of the plugin.
When an image is uploaded to WordPress if the Imagify plugin is set up the photo will automatically be optimized. At that time the photo will also be sent to Imagify’s server and be stored there for one hour. They will also send the photo back to your site and it stays there indefinitely. Even if you delete your account.
If you upload photos to the online website they will be stored there for 24 hours with the free account. If you have a paid subscription they will stay there for as long as you have an account
Final Thoughts On Imagify
Imagify is a user-friendly WordPress image optimization plugin that effectively reduces image size without compromising quality. Its features include powerful compression settings, bulk optimization, automatic backup, and support for WebP format.
While Imagify offers benefits such as improved website performance and compatibility with themes and plugins, it does have limitations like compression limits and potential image quality loss.
Overall, Imagify is a valuable tool for enhancing website speed and user experience, making it worth considering among other image optimization options in the market. Give Imagify a try today and experience its features for yourself and for FREE!


